light meter, photography
Let’s Talk About Your Light Meter
Apr
Unlocking Photography’s Magic: Understanding Your Camera’s Light Meter
In the realm of photography, light is everything. It’s the brushstroke of a painter, the melody of a musician, the essence that brings life to an image. And in the hands of a skilled photographer, light becomes the conduit through which moments are immortalized.
At the heart of this interplay between light and lens lies a silent but indispensable tool: the light meter. Often overlooked, yet fundamental to the art and science of photography, the light meter is the unsung hero that ensures your images are perfectly exposed, capturing the scene just as you envisioned it.
So, let’s delve into the magic of the light meter, understanding its workings, and unlocking its potential to elevate your photography to new heights.
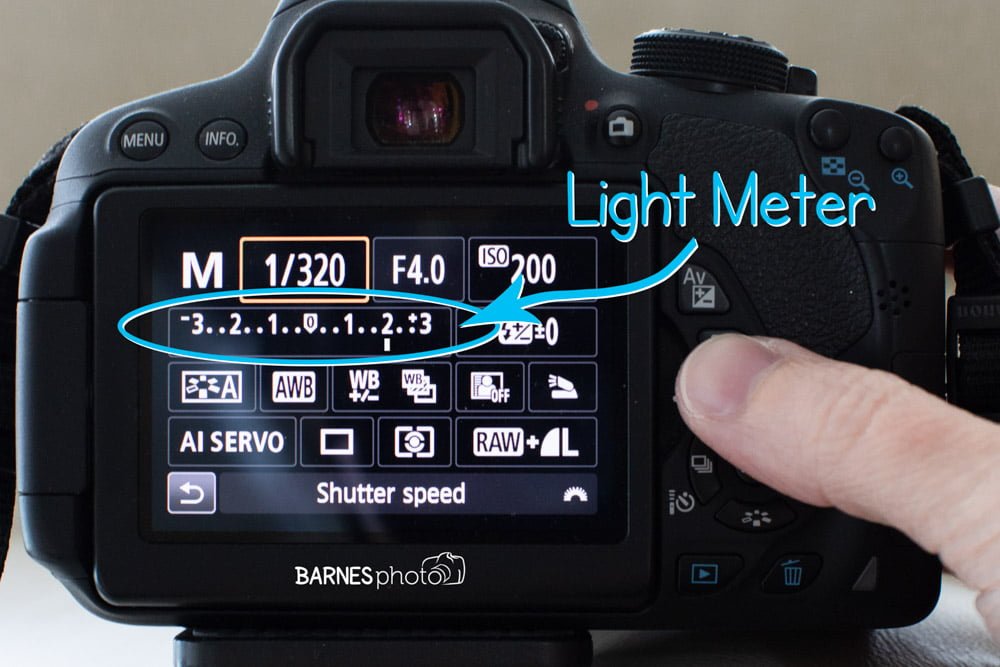
What is a Light Meter?
In simple terms, a light meter measures the intensity of light in a scene, helping photographers determine the optimal settings for exposure. Found in most modern cameras, the light meter evaluates the available light and provides guidance on aperture, shutter speed, and ISO settings to achieve a well-balanced exposure.
Types of Light Meters:
Built-in Light Meters: Integrated within the camera body, these meters analyze the light entering through the lens. They are convenient and readily accessible, providing instant feedback on exposure settings.
Handheld Light Meters: These are separate devices that photographers can use independently of the camera. While less common in the digital age, they offer precise measurements and are particularly useful in studio setups or situations where the built-in meter may struggle, such as extreme low-light conditions.
How Does a Light Meter Work?
Light meters operate based on the principle of reflective or incident light measurement.
Reflective Metering: This method assesses the light reflected off the subject. The camera’s built-in meter evaluates the brightness of the scene by measuring the light bouncing off the subject and surrounding objects. While effective in many situations, reflective metering can be influenced by the color and texture of the subject, leading to exposure inaccuracies in high-contrast scenes.
Incident Metering: In contrast, incident metering measures the light falling onto the subject. Photographers use a handheld light meter to measure the illumination directly at the subject’s position, independent of its color or texture. This method provides more consistent and reliable results, especially in challenging lighting conditions.
Understanding Metering Modes:
Modern cameras offer various metering modes, each tailored to different shooting scenarios:
Matrix or Evaluative Metering: The camera divides the scene into multiple zones and evaluates the light across the frame. It considers factors such as brightness, contrast, and subject distance to calculate the most suitable exposure settings. Matrix metering is versatile and well-suited for general shooting situations.
Center-Weighted Metering: This mode prioritizes the light in the center of the frame, giving more weight to the subject at the center while still considering the surrounding areas. It’s ideal for portraits or situations where the main subject is centrally positioned.
Spot Metering: Spot metering measures the light in a small area, typically around 1-5% of the frame. Photographers can pinpoint a specific area to meter, ensuring precise exposure for the subject, regardless of the surrounding scene. Spot metering is invaluable in high-contrast situations or when photographing subjects against a bright or dark background.
Mastering Your Light Meter:
To harness the full potential of your camera’s light meter, consider the following tips:
Learn to Interpret the Meter Readings: Familiarize yourself with the metering indicators in your camera’s viewfinder or LCD display. Strive for a balanced exposure, ensuring that neither highlights nor shadows are excessively overexposed or underexposed.
Experiment with Metering Modes: Explore different metering modes to understand their strengths and limitations. Test each mode in various lighting conditions to determine which works best for your style of photography.
Compensate for Tricky Lighting: In challenging lighting situations, such as backlighting or high contrast, use exposure compensation to adjust the meter’s recommendations. This allows you to retain detail in highlights and shadows, preserving the integrity of the image.
Trust Your Instincts: While the light meter provides valuable guidance, don’t be afraid to override its suggestions based on your creative vision. Photography is as much about intuition and artistic expression as it is about technical precision.
Conclusion:
In the grand tapestry of photography, the light meter stands as a silent conductor, orchestrating the symphony of light and shadow that defines our visual narratives. By understanding its nuances and mastering its intricacies, photographers unlock a world of creative possibilities, transforming mere moments into timeless works of art.
So, the next time you pick up your camera, remember the humble light meter silently guiding you through the dance of photons, empowering you to capture the essence of life in all its luminous splendor.